Instant Pot Duo Beginner's Guide: Start Cooking Safely & Easily
Welcome to the exciting world of Instant Pot cooking! If you've just unboxed your shiny new Instant Pot Duo and are wondering how to use Instant Pot safely and efficiently, you've landed in the perfect spot. It’s common to feel a little intimidated by a new kitchen appliance, especially one with so many buttons and functions. But rest assured, the Instant Pot Duo is designed for modern kitchens and beginner cooks alike, making delicious, healthy meals faster and easier than ever before.
Gone are the days of the loud, clunky stovetop pressure cookers our grandmothers might have used. The Instant Pot is an electric marvel, engineered with multiple safety mechanisms that make those old "explosion stories" a thing of the past. This comprehensive guide will walk you through everything from understanding its basic functions to performing your crucial first water test, ensuring you build confidence with your new culinary companion.
Demystifying Your Instant Pot Duo: What It Is & How It Works
At its core, the Instant Pot Duo is an electric multi-cooker that masterfully combines several appliances into one. While its primary claim to fame is pressure cooking, it's also capable of slow cooking, sautéing, making rice, steaming, warming food, and even making yogurt. Some models also offer sous vide functionality, truly making it a versatile workhorse in your kitchen.
The Magic of Pressure Cooking Explained
Understanding the fundamental principle behind pressure cooking will help you use your Instant Pot with greater confidence. The Instant Pot works by heating liquid inside a sealed pot. As the liquid heats, it creates steam, and because the pot is sealed, this steam builds up immense pressure. This high-pressure environment elevates the boiling point of water, allowing food to cook much faster and more thoroughly, all while locking in flavors and nutrients that might otherwise escape in traditional cooking methods.
A Golden Rule for Beginners: The Liquid Factor. Because steam is essential for pressure to build, you will almost always need liquid in your Instant Pot. As a general rule, aim for at least 1 cup (250ml) of thin liquid (water, broth, juice) for most pressure cooking recipes. There are exceptions, but this minimum ensures proper pressure generation and prevents scorching. Think of it as the engine oil for your Instant Pot – vital for operation!
For a deeper dive into the science and safety behind this incredible appliance, explore our article: Instant Pot Explained: Understanding Its Safe & Easy Pressure Cooking.
Your First Steps: Unboxing & Identifying Components
Many Instant Pots sit in their boxes for weeks, even months, before their owners brave the initial setup. Now's the time to change that! Let's get your Instant Pot Duo out of its packaging and ready for action.
Unpack with Confidence
Remove everything from the box. You’ll typically find the main cooker base, the inner pot, the lid, a power cord, a condensation collector, and often a trivet or steamer rack. Don't toss the manual yet – it's a valuable resource!
Get to Know Your Duo's Parts
Once unpacked, familiarize yourself with the core components:
- The Main Base: This is the outer shell where the heating element and control panel are located. Keep this dry and clean.
- The Inner Stainless Steel Cooking Pot: This removable pot is where your food goes. It's dishwasher safe and easy to clean. Always ensure it's properly seated in the base before adding ingredients or plugging in the unit.
- The Lid: This crucial component has the sealing ring, float valve, and steam release handle. The sealing ring on the underside is vital for creating the pressure seal, so ensure it's always clean and correctly seated.
- The Stainless Steel Trivet: A versatile accessory, this rack keeps food elevated above liquids, perfect for steaming, pot-in-pot cooking, or keeping items out of direct contact with the pot's bottom. You won't use it for every recipe.
- The Electric Power Cord: Plugs into the back of the base. Ensure it’s securely connected and plugged into a grounded outlet.
For more detailed setup advice, check out: Instant Pot Setup: From Unboxing to Your First Pressure Cook.
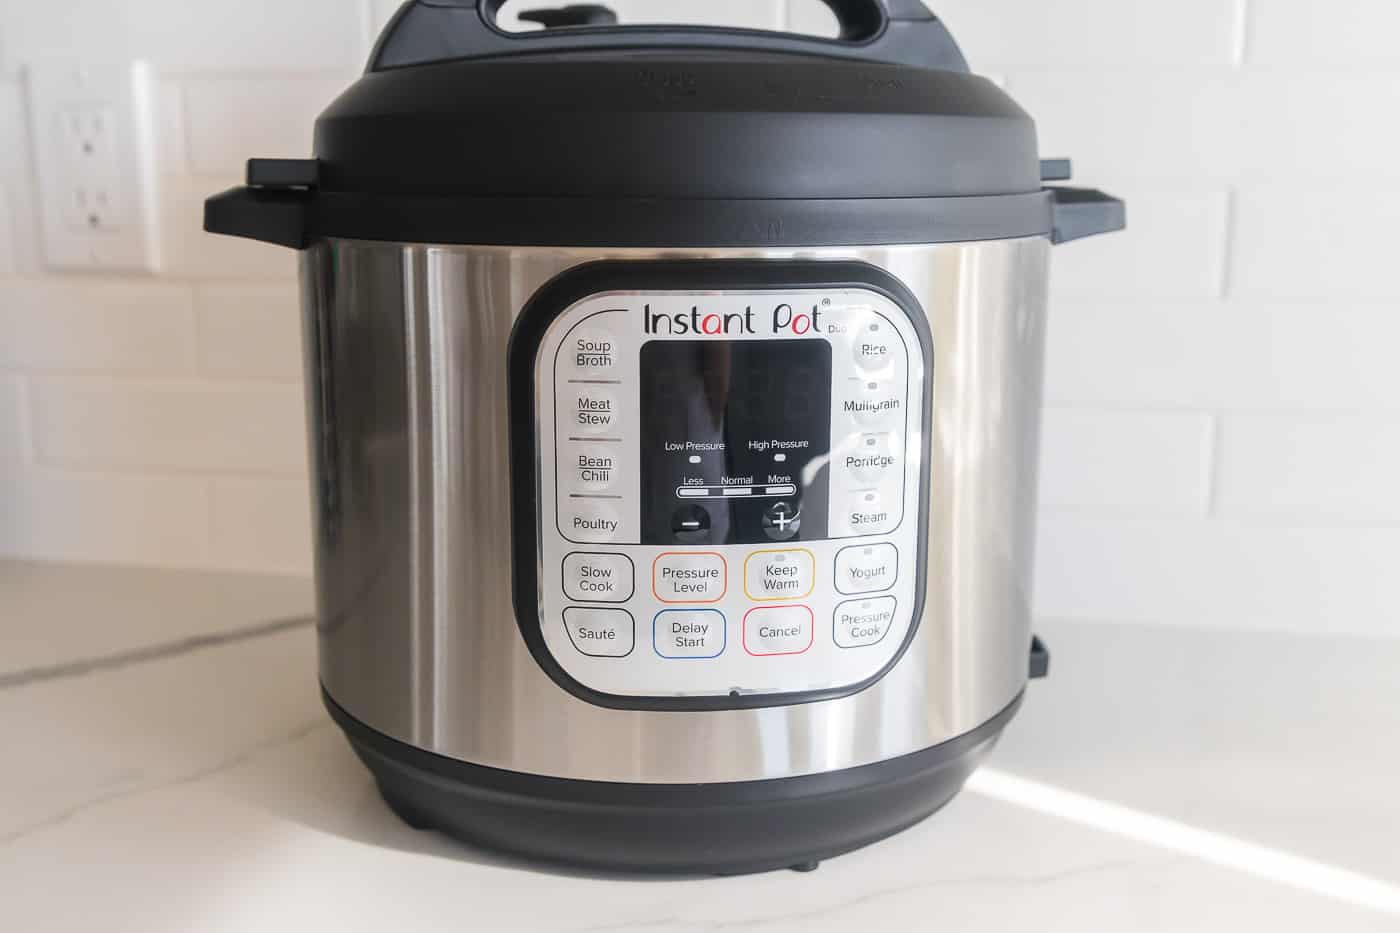
Navigating the Control Panel: Essential Buttons for Beginners
The array of buttons on the Instant Pot Duo's control panel can look overwhelming. Take a deep breath! For most beginner recipes and even many advanced ones, you'll only need to focus on a few key settings. Let's simplify how to use Instant Pot's controls.
- Pressure Cook / Manual Button: This is your primary button for pressure cooking. On newer models, it's often labeled "Pressure Cook." This allows you to set a custom pressure cooking time.
- Pressure Level Button: Press this to toggle between "High Pressure" and "Low Pressure." For the vast majority of recipes, you'll be using "High Pressure."
- +/- Buttons (or Arrows): These buttons are used to adjust the cooking time (in minutes) after you've selected a cooking program like "Pressure Cook."
- Cancel Button: Your "stop" or "undo" button. Press this to cancel any cooking program, reset the Instant Pot, or stop the cooking process midway.
Don't worry about all the other preset buttons like "Rice," "Soup," "Meat/Stew," "Bean/Chili," etc., just yet. These are convenient shortcuts that automatically set a specific pressure cooking time and pressure level for common foods. However, the "Pressure Cook" button gives you full control, which is excellent for learning and adapting recipes.
Your Inaugural Cook: The Essential Water Test
The water test is the most important first step for any Instant Pot beginner. It's like a safety drill and a warm-up all in one. It allows you to:
- Familiarize yourself with the Instant Pot's operation.
- Ensure the sealing ring and lid are functioning correctly.
- Experience the process of pressurizing and de-pressurizing without the stress of potentially ruining food.
- Build confidence before tackling your first recipe.
Step-by-Step Water Test Guide
- Placement & Power: Set your Instant Pot on a sturdy, level countertop, away from overhead cabinets, as steam will release upwards. Ensure the inner pot is clean and properly seated in the cooker base. Plug in the power cord. The display will show "OFF" or be blank.
- Add Liquid: Pour 2-3 cups of tap water into the inner stainless steel pot. (More than the minimum 1 cup is fine for the water test to clearly see steam.)
- Secure the Lid: Place the lid on the Instant Pot, aligning the arrow on the lid with the arrow on the base (or the unlocked symbol). Twist the lid clockwise until it locks into place, aligning with the locked symbol. Ensure the steam release handle (on top of the lid) is set to the "Sealing" position.
- Program the Cook: Press the "Pressure Cook" button (or "Manual"). Use the "+" / "-" buttons to set the time to 5 minutes. Ensure the "Pressure Level" is set to "High." After a few seconds, the display will switch to "On" as it begins to preheat.
- Let It Work: The Instant Pot will now begin to heat and build pressure. This "preheating" phase can take 5-15 minutes, during which you might hear slight hissing or bubbling. Once pressure is achieved, the silver float valve next to the steam release handle will pop up, and the timer will begin counting down from 5 minutes.
- Release Pressure: Once the 5-minute countdown finishes, the Instant Pot will beep and display "L0:00" (or similar), indicating it's now in "Keep Warm" mode. To release the pressure for the water test, carefully turn the steam release handle from "Sealing" to "Venting." Stand clear of the steam vent – it will be loud and hot! The steam will gush out until the float valve drops back down.
- Open & Observe: Once the float valve has dropped, it's safe to open the lid. Twist it counter-clockwise to unlock, then lift carefully, tilting it away from your face to avoid any residual steam. The water inside should be hot. You've successfully completed your first Instant Pot cycle!
Congratulations! You've successfully learned the basics of how to use Instant Pot and completed your first crucial step. You’re now equipped with the fundamental knowledge to confidently operate your Instant Pot Duo and embark on your culinary adventures.
Conclusion
The Instant Pot Duo is a game-changer for home cooks, offering a safe, efficient, and versatile way to prepare a wide array of dishes. By understanding its core components, familiarizing yourself with the essential control panel buttons, and successfully completing the initial water test, you've overcome the biggest hurdle to mastering this incredible appliance. Embrace the convenience and culinary possibilities that your Instant Pot offers; you're now ready to unlock a world of quick, delicious, and healthy meals!
